Saturday, August 29, 2009

Cabs and a visit from my daughter - a nice combination

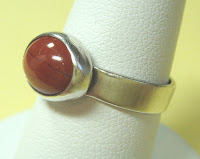
This weekend, my local Bellevue bead shop, Quiltworks Northwest, is hosting the owners of Out of Our Mines lapidary and beadworks. It's the first time I've seen their beads and cabochons and I spent a good deal of time at their table. The cabs were of particular interest to me as I begin crafting bezel set rings and pendants. I picked up these beauties and one other that I've already set into a ring for my daughter (pictured below). There were so many more cabs that I would have liked to purchase and I'll definitely be going to their website in the future.
My 24 yr old daughter is visiting us from MN this weekend. It's so nice to have her here for a change. She made a terrific dinner for us on Thursday evening, we've walked, talked, laughed a lot, went to a movie (Julie and Julia), shopped a bit, and made jewelry together. She's going home tomorrow with a new ring and about a dozen pairs of earrings - she rummaged through my leftover bead stash and came up with some beautiful combinations! We've had a great weekend; I'll be sad to send her back to MN tomorrow.

Thursday, August 20, 2009

Blue Impression Jasper


A quick post this morning as I get ready for the day with out of town guests. I set this blue impression jasper stone into a pendant yesterday. I started it in my soldering class and finished it at 3:00am today! It's going to be a tough day for me today as I face it on 3 hours of sleep. I'm getting just a little obsessed here. I need some balance.

While setting this stone, I put a number of surface scratches in it. I tried polishing it with some of my metal polishes and added a bit of wax. That hides the scratches pretty well, but I'm wondering if anyone has some advice for me about how to polish out the fine scratches that I see when looking from the side. I'll try tumbling it later on, but I really have no experience with this sort of thing yet. I know it was foolish of me to not cover the stone while setting it, but... I guess I was just too lazy...which is a shame.

I think I'll be keeping this one for my own wear, as it has a sloppy solder on the bezel wire. It looks like I almost fried the metal. I may dip the whole thing in liver of sulfur; that might hide the mark. This was an experiment and my first time soldering at home. For now I'm using a propane torch and the heat is a little different than the acetylene ones we use in class. It will take some getting used to. But overall, my soldering skills are improving nicely. I'm loving working with fire.

Wednesday, August 12, 2009

Why rivet when you can solder? I CAN solder!

Today was day 2 of 4 in my soldering class at Pratt Fine Art Center in Seattle. What a fun day! We learned a few new techniques including sweat joints, soldering wire to sheet and soldering posts to earrings. Our teacher for this class is Roger Horner and he's an excellent teacher and craftsman. He primarily works with hollow ware. He's patient, knowledgeable and informative; I feel fortunate to be learning from him.

Before today's class, I made the components (links and spirals) for the pictured bracelet. Today, I soldered the sterling wire spirals to the sterling links during class. The bracelet has 8 links and 5 of 8 solders worked on my first try. The remaining 3 had to be soldered twice, but all worked fine on the second go round, so I feel really good about them. I also soldered spiral links shut for a necklace similar to one I've posted in the past, but now there will be no chance of the links sliding off their connecting rings.

As I expected, soldering will add another level of professionalism to my jewelry. Rivets, which I have done a lot of in the past, are nice for items that have an industrial quality to them, but soldering will allow me to add more delicate things and better finishing touches to my work.

I've spent the past week shopping for/hunting down items to prepare a soldering station at home. Boric acid, borax, TSP, Sparex, flux, various types of solder, torch tips, titanium picks... the list goes on... I'm almost ready! I'll be moving my workspace from the office to a spare bedroom (which will no longer be a bedroom) later next month. I need the room prior to that for visiting guests, but after that time, we will have 'only' one guest bedroom and a fold out couch in the bonus room when we have company. I'm getting so eager to move in! Right now I have my flex shaft set up in the garage and I'm planning a temporary soldering set up there as well. Oh, how I miss our MN basement and the wonderful workshop Rich had built (for himself) there. I could really use it now. Our WA home doesn't have a basement :( Who knew I would ever need or want a workshop of my own?

Wednesday, August 5, 2009

Building confidence

I spent a wonderful morning today attending a soldering class at Pratt Fine Arts Center in Seattle. You may recall my first experience with soldering in June was a very frustrating one for me. So, I signed up for this 4 day class (every Wed. in August) devoted just to building soldering skills.
The relaxed pace and skilled teacher were just what I needed to boost my confidence and hopes that I will someday be able to master soldering and expand my metalsmithing line. Today we learned all about various types of solder and fluxes. I found it really helps me to understand the whole chemical process of what happens to the metal when it's heated as well as what happens to the solder and how it flows. The process makes so much more sense to me now and as a result, I'm having an easier time with the skills involved.

The treble clef bracelet pictured above is a custom order prototype experiment at the request of one of my etsy customers (I love repeat customers!). I formed the bracelet a few days ago out of a single piece of copper wire. I brought it along to class today to try my hand at soldering the places where the wire overlaps. It worked!!!!! Big sigh of relief!!! I'll be making it in sterling sometime in the next month. I spent the afternoon hammering, sanding and polishing it with my new Foredom Flex Shaft. I'm pleased with the end result and I think I'll be wearing it occasionally - because I want to "test drive" the design before I make it in sterling silver and because I really like the bracelet itself. I think I'm attracted to it for two reasons; one I love music and two, the treble clef has a spiral in it and you know how much I love spirals in my jewelry! I think I'll probably use a heavier gauge wire when I make it in sterling silver (I used 12 gauge here), just to give it a little more heft stability.

The ring pictured is one I made at my June class and my only 4 successful solders during that stressful 4 day class. I had originally polished it to a high shine and have been wearing it daily for 2 months now. It was getting all kinds of scratches in it, so today when I was polishing the treble clef bracelet, I decided to try giving this ring a satin finish and then oxidizied it lightly. I can always polish it again later if I decide I want it shiny again. So far, I like the satin look and I hope it will eliminate the problem of the ring appearing scratched. It's is subjected to all kinds of scratchy things on a daily basis because I wear it constantly - even while I make other jewelry.